Oracle EBS provides a way to restrict the type of files which can be uploaded though the front end. This will, for example, prevent users from uploading specific file types through the Generic File Manager or from uploading XML report files (which is how I came across this feature).
The two main parts to this feature is the Attachment File Upload Restriction Default profile option and the FILE_MIME_TYPES table.
The FILE_MIME_TYPES table lists the various file types and specifies whether they are allowed to be uploaded or not. The Attachment File Upload Restriction Default profile option controls those file types which have not been explicitly allowed or disallowed in the FILE_MIME_TYPES. Attachment File Upload Restriction Default can have a value of Yes or No. If it is set to Yes, a file type can be uploaded from the front-end even if it has not been explicitly allowed or disallowed in FILE_MIME_TYPES. Setting this value to No will prevent the user from uploading any file type which has not been explicitly allowed in FILE_MIME_TYPES.
When this feature prevents users from uploading a file, they will see this message on the screen: This file type is not allowed. Please choose another file
For more details please check Metalink Note#1357849.1: Security Configuration Mechanism in the Attachments Feature in Oracle E-Business Suite.
Category Archives: EBS R12
Custom Commands in WinSCP
The WinSCP tool provides a couple of handy features which allow users to execute custom commands directly on the server without having to open a separate terminal.
One such feature is the Command Line which you can enable from Options – Command Line. This will display the command line at the bottom of the GUI where you can execute arbitrary commands. The restriction is that you cannot enter any commands which require user-inputs or involve data transfer. You can enter commands like ‘ls -ltr’ to list files and the results will be displayed in a console window which pops up to display the output.
The second feature can be enabled from Options – Toolbars – Customer Command Buttons. Once enabled, a set of pre-existing commands such as Execute, Touch, Grep etc will be displayed. So if , for example, you want to execute a shell script on the remote server, you select the appropriate file and then click on the Execute command. The shell script will get executed. This saves you from the trouble of having to open a new terminal and then typing the command to execute the script.
However, the most interesting thing about this feature is the little gear symbol. Click on this gear symbol and you will realise that you can modify the pre-existing commands and add your own ones. This is especially useful when you have to do some repetitive task such as compiling a form or uploading a workflow in Oracle EBS.
Click on the images for a larger view.

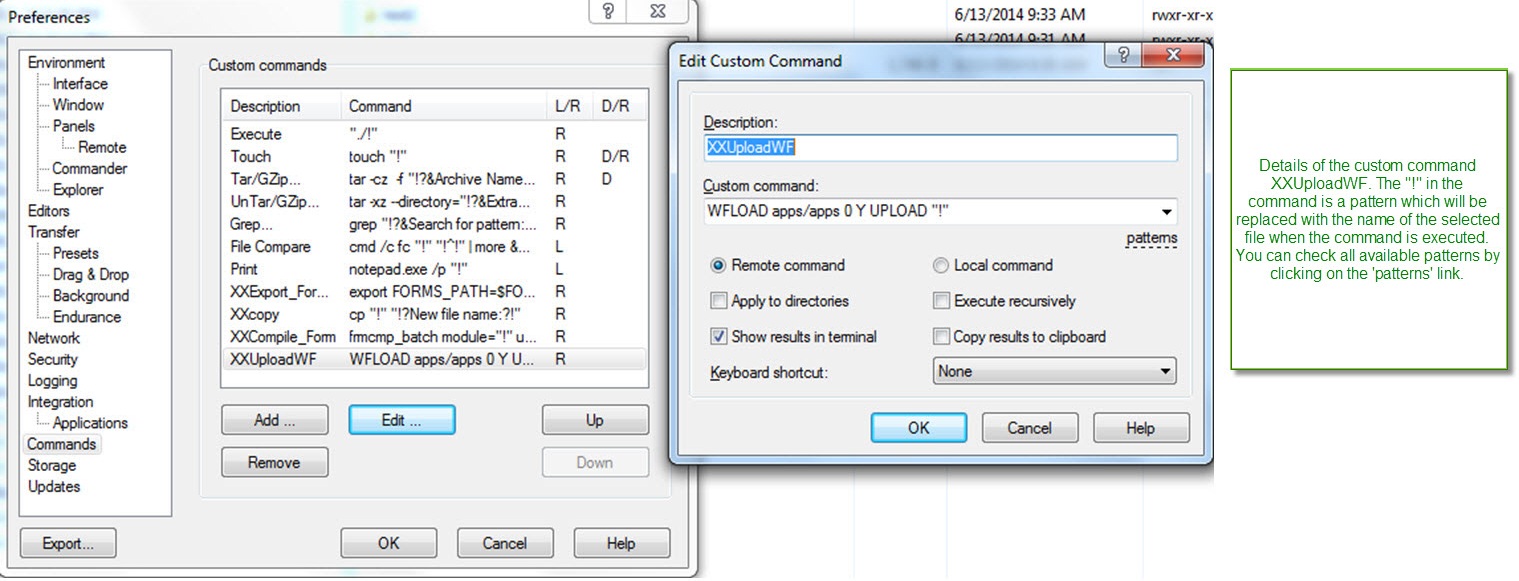
You can write you own custom command to compile a form or to upload a workflow file. So the next time you make changes to the form or workflow you can just copy it to the server, select the file on the server and click on your custom command. You do not have to perform the additional step of opening a server session on PuTTY to execute the compile or upload command. The screenshot below shows the details of the XXUploadWF custom command which I use to upload workflow files.
Another useful custom command I have defined is XXCompile_Form. The command for this is
frmcmp_batch module="!"; userid=apps/temp4 output_file=`echo "!"; | awk '{print substr($0,0,index($0, ".fmb")-1)}'`.fmx module_type=form compile_all=special
It compiles the selected .fmb file(in an EBS R12 environment) and generates an .fmx file of the same name.
More details on writing custom commands for WinSCP is available here.
Outbound Customer Interface Using Business Events – The Bare Bones
It is possible to write an outbound customer interface in Oracle without using Business Events. You would start by writing an SQL query which fetches data from the various TCA tables containing the entities that you are interested in. So, for example if you want to write an outbound interface which fetches all new and updated parties, you would start with something like
SELECT party_name
      ,party_number
      ,party_type
FROM   hz_parties
WHERE TRUNC(last_update_date) = TRUNC(SYSDATE);
However, as the TCA entities and their relationships increase in both number and complexity in the EBS instance, it becomes more practical and easier to use Business Events to track and record the changes. What are business events? Well, they are just some events which are fired whenever specific business actions take place.For more information on business events, Google is your friend. Using business events to implement an outbound interface essentially involves two steps:
- Identifying the appropriate business event
- Creating a subscription for the event
Let us assume, for simplicity’s sake, that we want to implement an outbound interface which is used to send updated customer account information to an external system. The first step, in such a scenario, is identifying the business event which would be raised when a customer account is updated. One of the better ways to do this is from the Integration Repository which is accessible from the Integrated SOA Gateway responsibility in R12. You can also query the WF_EVENTS_VL or try looking up the documents. The business event raised when a custom account is updated is ‘oracle.apps.ar.hz.CustAccount.update’.
Once this is known, we need to create a subscription for this. You create a subscription to specify a set of actions which need to be performed whenever a certain business event takes place. In our case, let us assume that whenever the ‘oracle.apps.ar.hz.CustAccount.update’ event is raised (that is, whenever a customer account is updated), we want to store the account information in a staging table. At the end of the day, we will collect the information for all accounts that were updated during the day and send it to an external system. So, in our case the subscription that we will create will fetch information for the updated customer account and store it in a staging table. The subscription can perform actions such as calling a Java class, a PL/SQL function or a Workflow Process. In this case, we will call a PL/SQL function. As a rule, the PL/SQL function should have the following input parameters and should return a VARCHAR2 data type.
FUNCTION insert_stg_tbl (p_subscription_guid IN RAW
                        ,p_event IN OUT NOCOPY wf_event_t)
RETURN VARCHAR2;
One thing to note here is that each event has it own parameter(s) which will be passed on to the function called by the event subscription when the event is raised. They are accessible from the p_event parameter in the function. For the ‘oracle.apps.ar.hz.CustAccount.update’ business event, the p_event parameter will contain the cust_account_id. A list of parameters for various events is provided in the Oracle Trading Community Architecture Technical Implementation Guide.
With the basic theory out of the way, here are the steps that need to be followed to complete our interface:
From any appropriate Workflow responsibility, go to the Business Events page (For example: Workflow Administrator Web Applications>Administrator Workflow>Business Events) and search for the event ‘oracle.apps.ar.hz.CustAccount.update’
Click on the images for a larger view.

Click on the Subscription icon to view existing subscriptions for the events.

Click on the Create Subscription button to create a new subscription. Most of the required fields should be auto-populated. If not, fill in the details as show in the screenshot. The value for the ‘Sytem’ field will be available in the LOV. The ‘Action Type’ should be Custom. After entering the values in the fields, click on the Next button

In the ‘PL/SQL Rule Function’ field, enter the name of the function which will be used to perform actions when the event is raised. I have entered xx_cust_outbound_pkg.insert_stg_tbl where xx_cust_outbound_pkg is the package which contains the function insert_stg_tbl. Enter values in the ‘Owner Name’ and ‘Owner Tag’ fields. These should be valid application short names. Then click on the Apply button.

For our subscription function, we need to create a table which will store the cust_account_id, the account_name, the action that was performed and the last_update_date
CREATE TABLE xx_cust_outbound_tbl(
cust_account_id NUMBER
,account_name VARCHAR2(254)
,action VARCHAR2(30)
,last_update_date DATE
);
The package specification and body containing the function is provided below
CREATE OR REPLACE PACKAGE xx_cust_outbound_pkg IS

 FUNCTION insert_stg_tbl (p_subscription_guid IN RAW
 ,p_event IN OUT NOCOPY wf_event_t)
 RETURN VARCHAR2;

END xx_cust_outbound_pkg;
/

CREATE OR REPLACE PACKAGE BODY xx_cust_outbound_pkg IS
 --function which will be invoked by the subscription
 FUNCTION insert_stg_tbl (p_subscription_guid IN RAW
 ,p_event IN OUT NOCOPY wf_event_t)
 RETURN VARCHAR2 IS

 lv_cust_account_id NUMBER;
 lv_account_name VARCHAR2(254);

 BEGIN
 --check the event name
 IF UPPER(p_event.geteventname()) = 'ORACLE.APPS.AR.HZ.CUSTACCOUNT.UPDATE' THEN
 --if an account is updated, store the cust_account_id, account_name, action performed and update date in the staging table

 --get the CUST_ACCOUNT_ID
 lv_cust_account_id := p_event.getvalueforparameter('CUST_ACCOUNT_ID');

 --get the account name based on the CUST_ACCOUNT_ID
 SELECT account_name
 INTO lv_account_name
 FROM hz_cust_accounts
 WHERE cust_account_id = lv_cust_account_id;

 --insert into staging table
 INSERT INTO xx_cust_outbound_tbl VALUES (lv_cust_account_id, lv_account_name, 'ACCOUNT_UPDATE', SYSDATE);

 END IF;
 COMMIT;

 RETURN 'SUCCESS';

 EXCEPTION
 WHEN OTHERS THEN
 RETURN 'ERROR';
 END insert_stg_tbl;

END xx_cust_outbound_pkg;
/
Once these steps are done all you need to do is update a customer account by navigating to Trading Community Manager>Trading Community>Customers>Standard, wait for the event to be processed and voila! you have the details in your staging table.

Notes:
- Anil Passi’s blog has a code listing which you can use to find the parameters for a business event.
- To check if an event was raised, you can query the WF_DEFFERED table (provided you entered a phase>99 while creating the subscription) where the CORRID column stores the event name in the form APPS:<event_name>. A value of 2 in the STATE column indicates that the event was processed.
- Noticed that sometimes in EBS 12.1.3 changing the name of the subscription function in the front end does not take effect unless the middle tier is bounced. Could be an issue with my instance though.
